Getting to the Kiosk Settings #
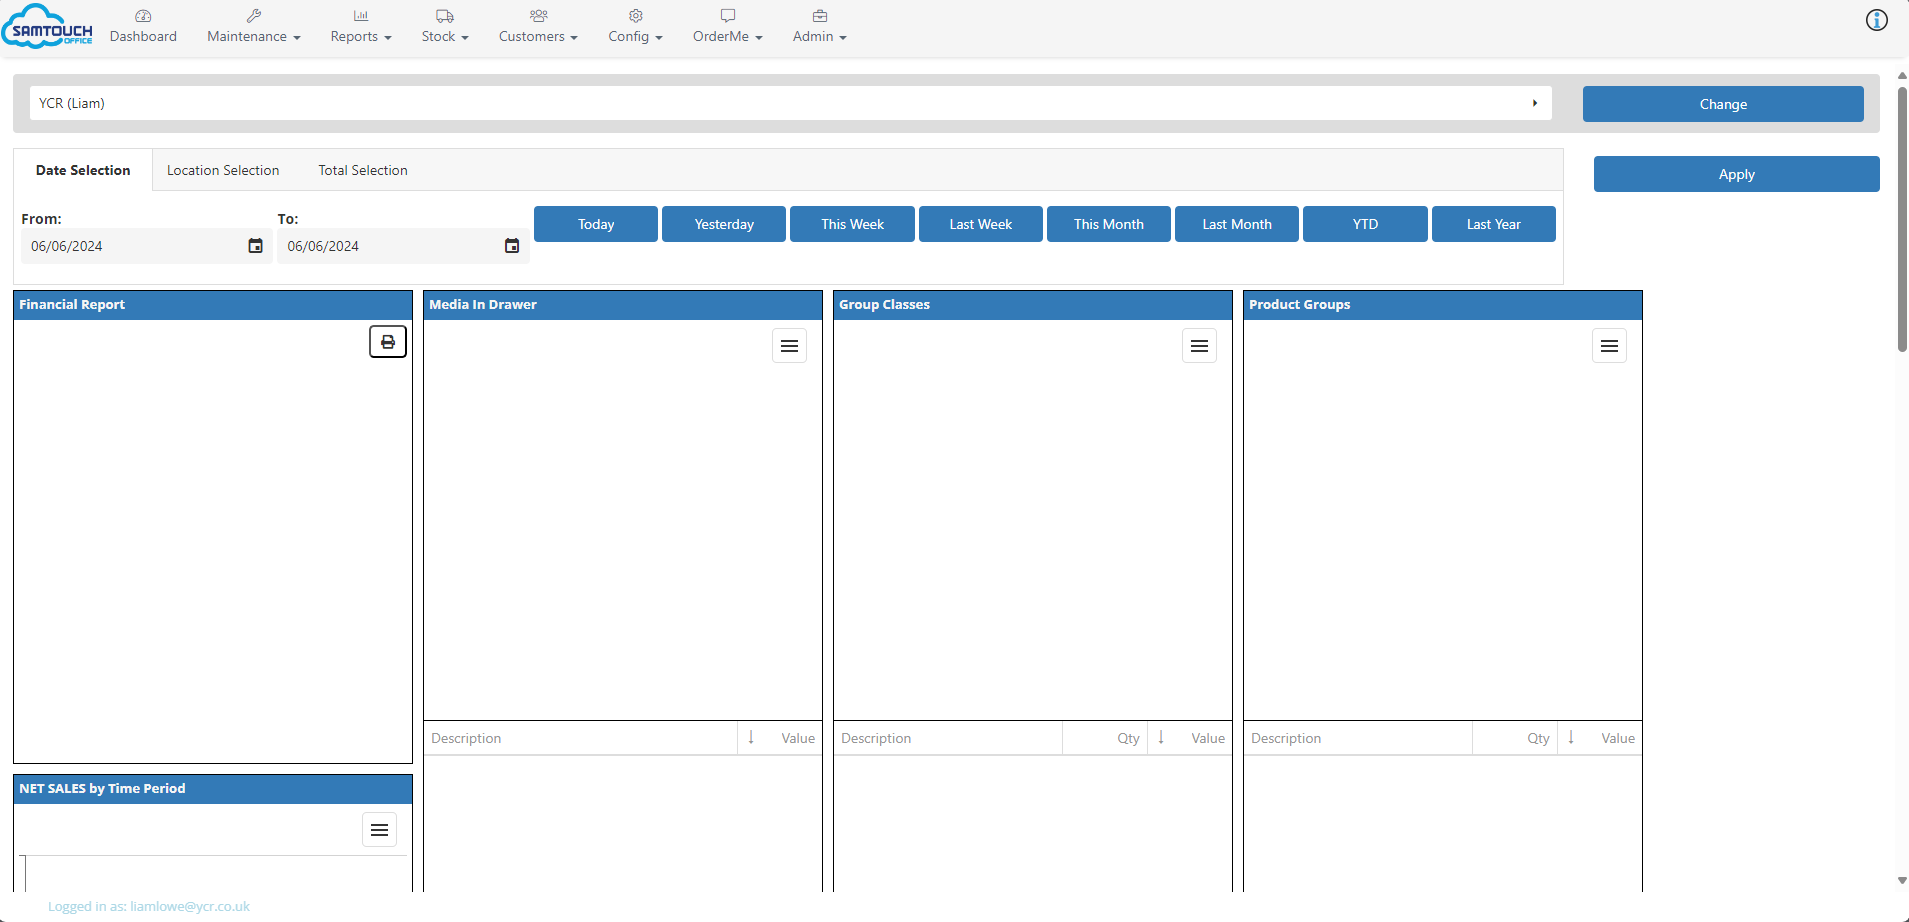
Now that we have created a tenant and / or linked a terminal to the Cloud. We can begin the setup of the Kiosk terminal. To do this you will first need to log in at either SamTouch Office (samtouchoffice.co.uk) or eZeePOS Office (ezeeposoffice.co.uk). Once logged in, you will be taken to your tenant dashboard:
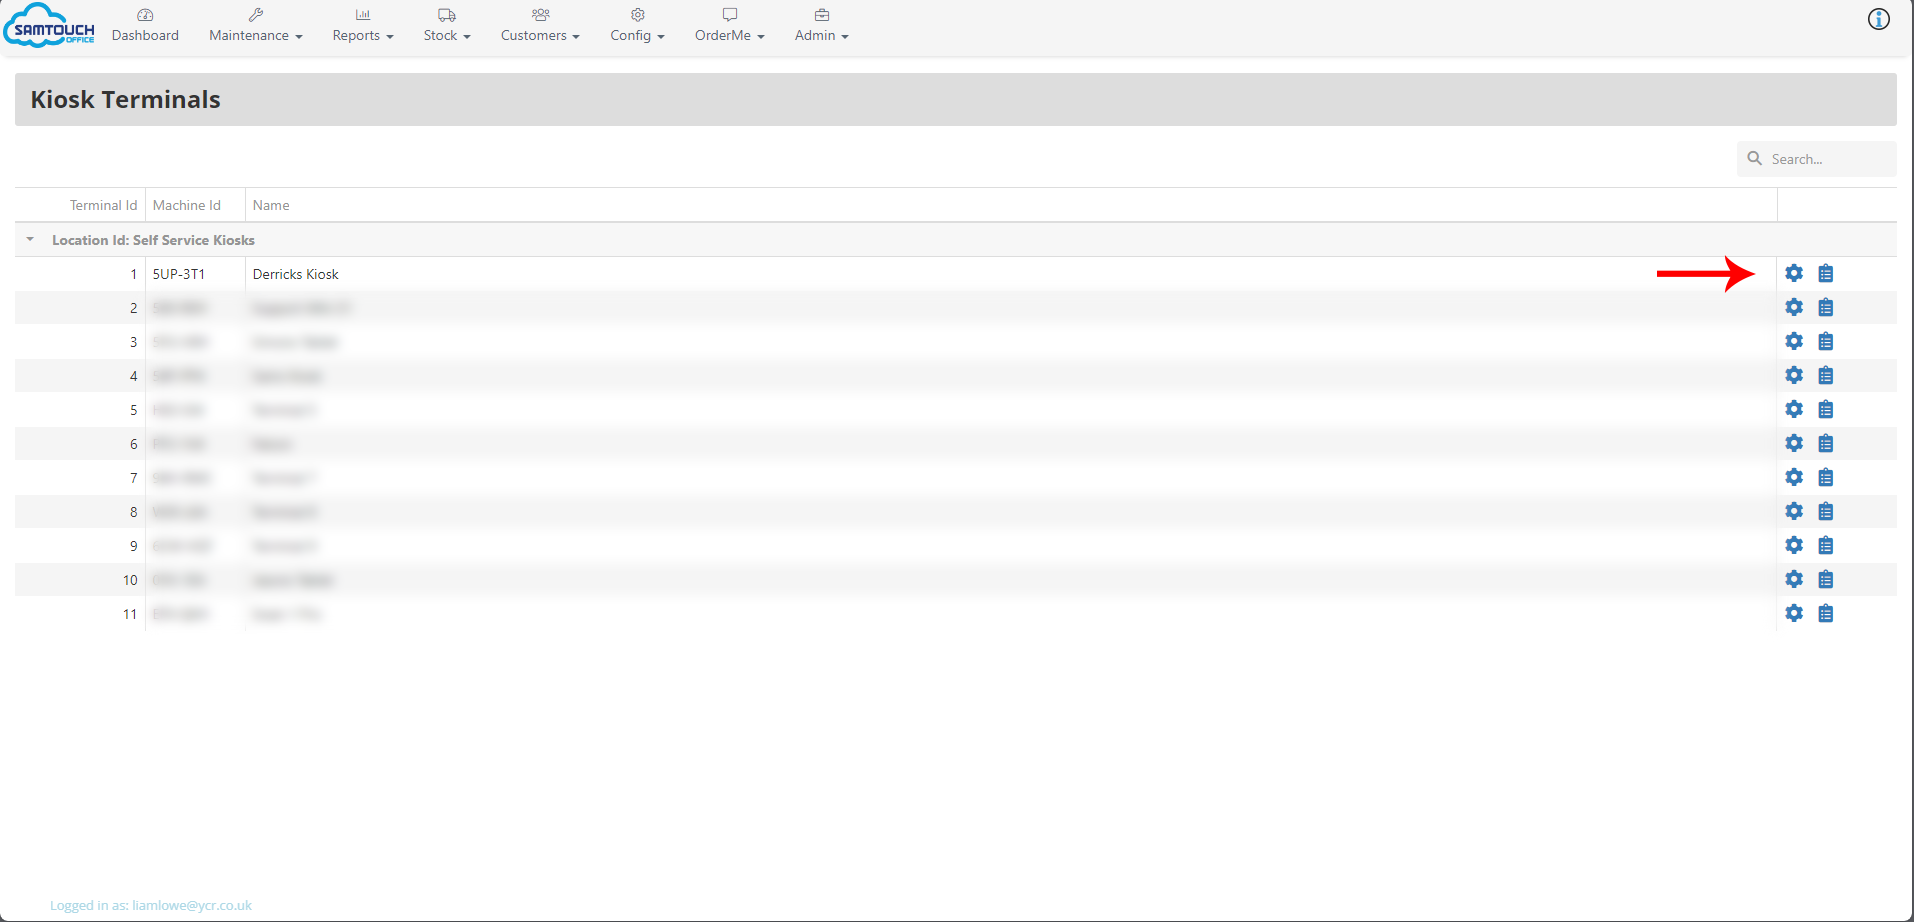
From here, you will want to go to Config -> Terminals -> OrderKiosk Terminals, where you will be taken to the below screen with the list of your Kiosk terminals. To access the configuration, press the Cog on the right-hand side of the terminal you wish to configure.
Kiosk Initial Settings #
Once we get to the Kiosk Terminal Configuration page, the first section we have are the main initial settings. Here’s what each setting / option is for:
- Terminal Name: This is the name of the kiosk terminal, and is used to identify what this terminal is. This could be useful to determine where the kiosk is located and what it is used for.
- Transaction Auto Timeout: This is in seconds how long it will take before the timeout warning dialog appears. This will then give the customer 60 seconds to tap the screen to continue, and if they don’t, the kiosk will go back to the Front Page and the order will be cancelled.
- Back Office Password: If set, when trying to access the terminal configuration page on the device itself, it will ask for this password.
- Sort Order: This is how the Kiosk will sort the product order within their Kiosk groups.
- Program File Polling Enabled: If ticked, it will automatically refresh the terminal data based on the time the Polling Interval is set to.
- Polling Interval: This is the time in minutes how long the Kiosk will automatically refresh the terminal data if the Polling Enabled flag is turned on.
- Print Card Receipts From Kiosk: If ticked, a card receipt will also print at the Kiosk.
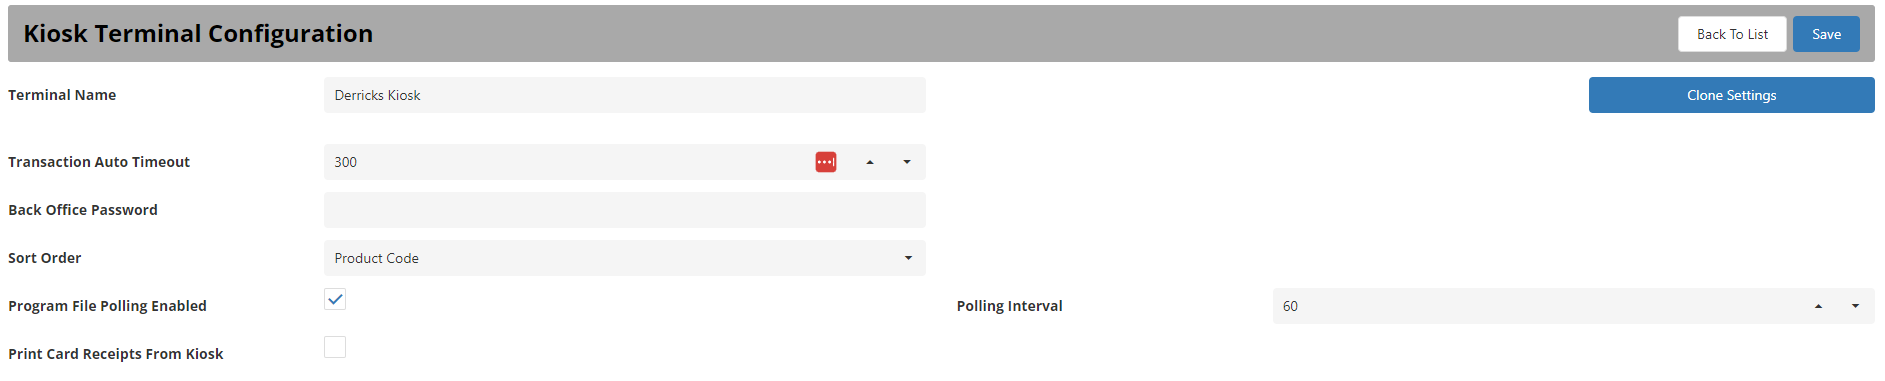
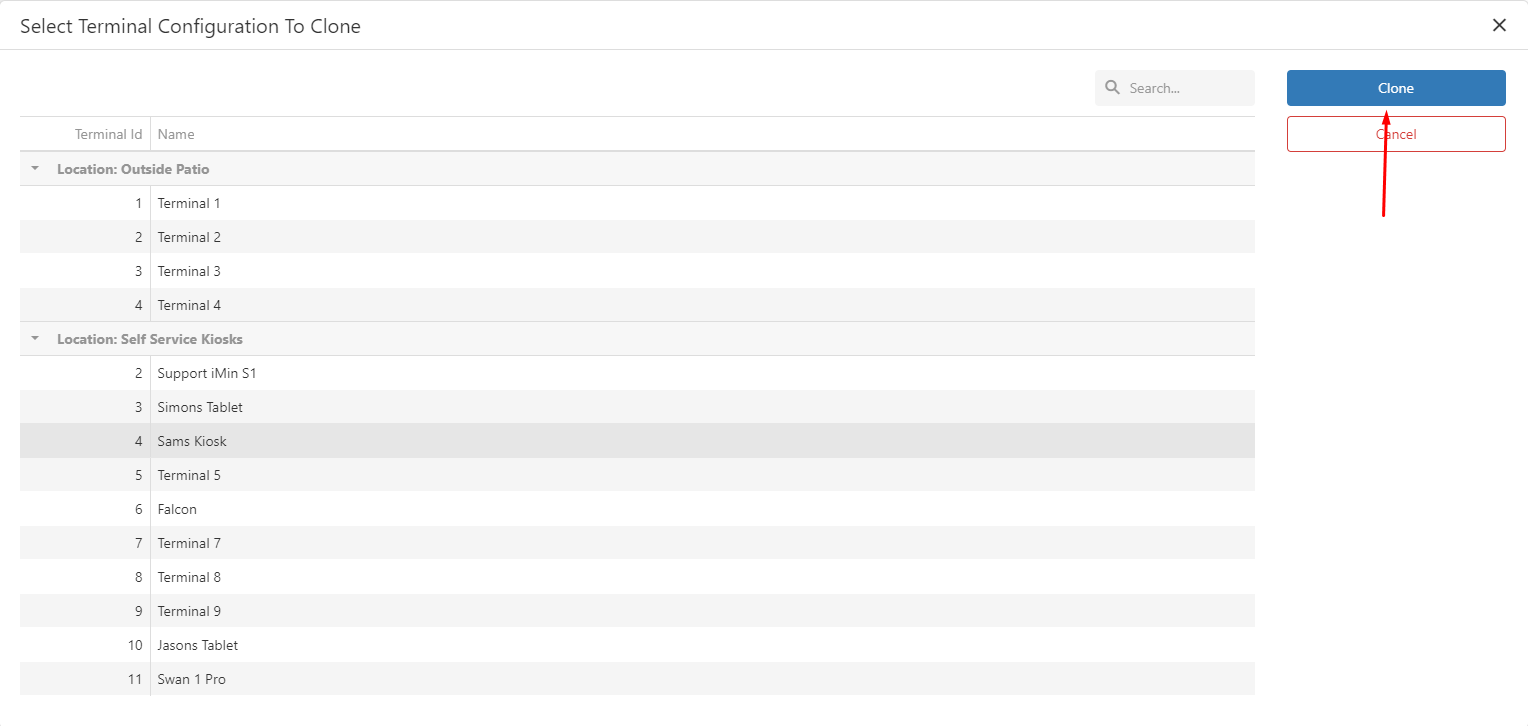
There is also the Clone Settings button at the top-right. This can be used to copy the settings for a different terminal that is already set up to the kiosk you are currently on. To do this, press the button, and this will take you to the below page. All you do is select the terminal you would like to clone from and then press Clone at the top-right.
The Kiosk Tab #
This section is used to set which Clerk the kiosk will use, and also which Top Level Kiosk Groups it will display. This of course will mean you will first need to setup a clerk and the Kiosk Groups before doing this. If you have set this up, then to add a clerk, simply choose the clerk you wish to use from the drop-down list. Below this we can add the Kiosk Groups. To do this, simply press the Add Groups button, choose which groups you would like displayed on the top-level, and then hit Select. You should then be able to see the Top Level Groups in the list below.
Insert image here of Top Level Kiosk Groups
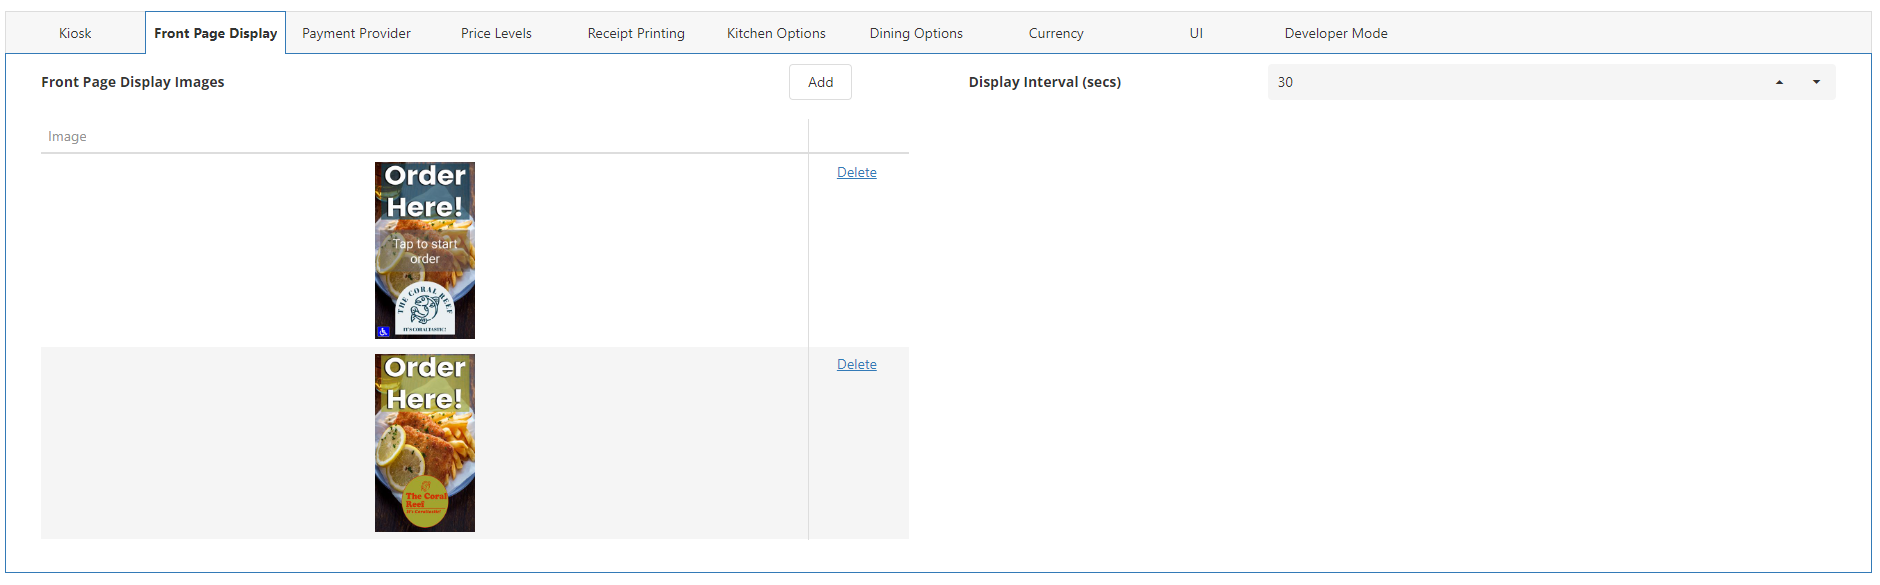
Front Page Display #
This section is used to define what images are displayed on the front page of the Kiosk application when it is not currently in use. It is recommended to choose images here that fit around the resolution of the device you are using. To add an image, press the Add button, this will open the Image Selection window. If you have already uploaded an image via the Image Library, you can select it from the list here. If you need to upload an image, hit the Choose Image button on the right-hand side. This will open a file explorer where you can navigate to where your image is saved and select this. Once selected, enter a description if required, and then press Upload. You should now be able to choose this image and hit the Select button which will add this to the Front Page Display list. You can add multiple images if required, and this will scroll through these, the timing of which is determined by the Display Interval (Secs) option.
Payment Provider #
This is the section used to determine which payment provider will be used to take payments. As there are a number of different payment providers available, please refer to the specific payment provider guide for instructions on how to set up. For testing purposes, you will just want to set the Payment Provider to No Gateway and the transaction will automatically finalize without payment.

Price Levels #
Multiple different prices can be set against a product, up to 6. These settings allow you to rename what those price levels are called for this specific terminal.

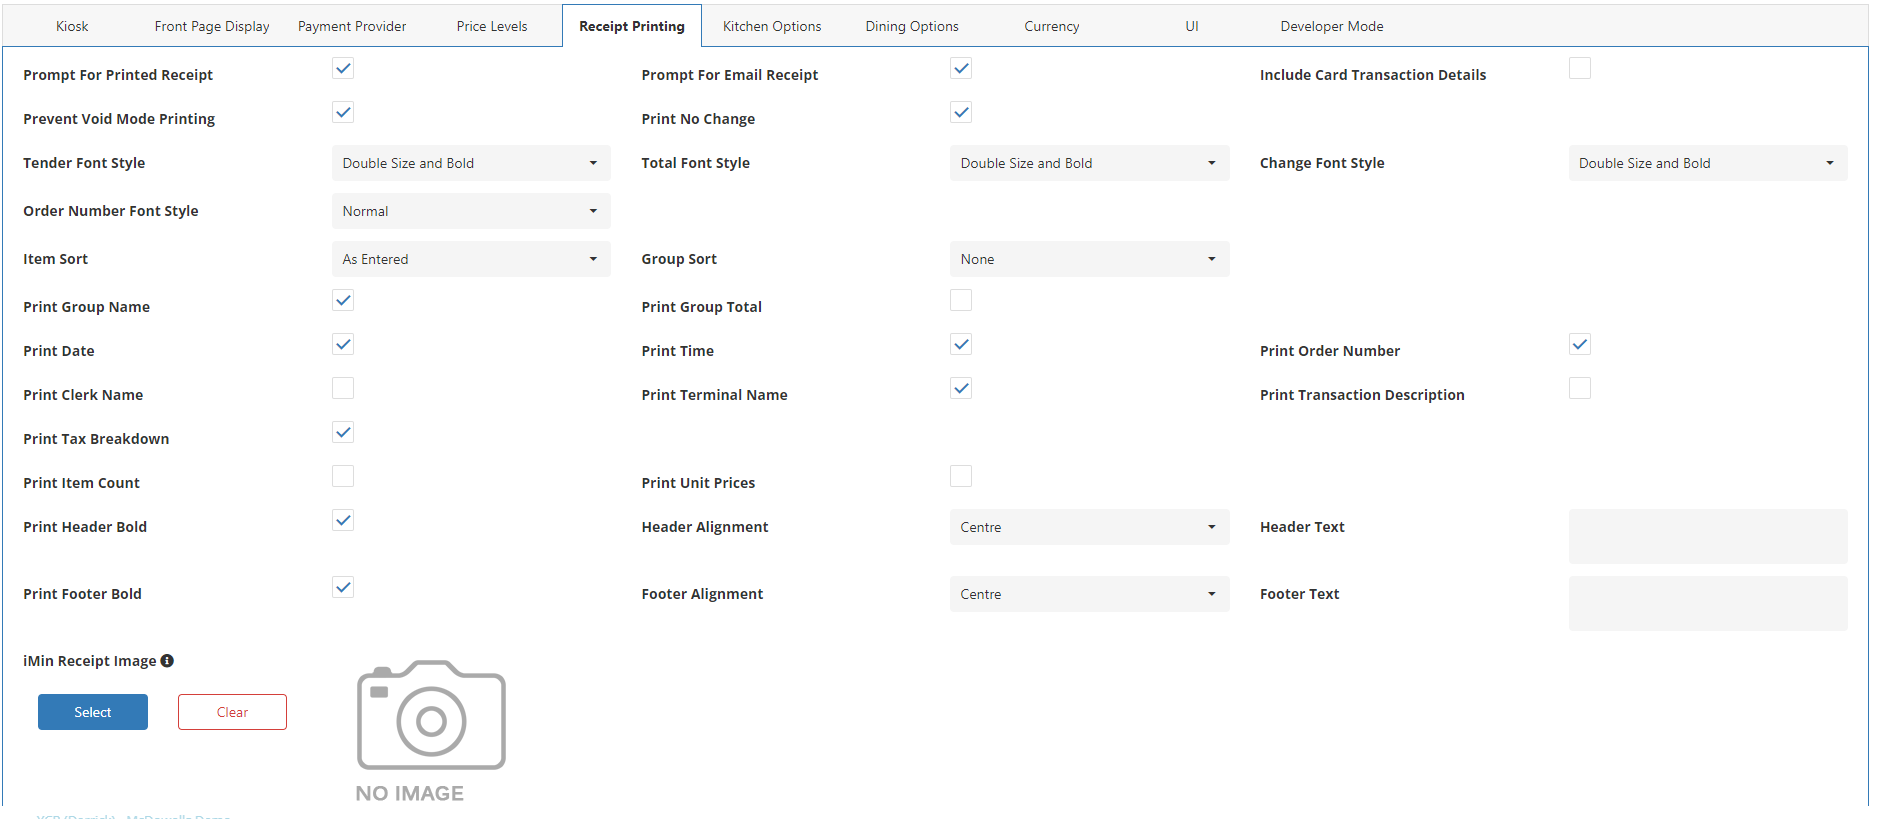
Receipt Printing #
These options are used to determine how the customer’s receipt will print. Working from the top down, we have the following options:
– Prompt For Printed Receipt: If ticked, when the receipt is set not to print on eZeePOS, once the transaction is finalised, it will prompt asking if the receipt needs to be printed.
– Prompt For Email Receipt: If ticked, when the transaction is finalised, it will prompt whether the customer would like an email copy of the receipt. If Yes is pressed, the staff member can enter the customer’s email address.
– Include Card Transaction Details: If ticked, when using an integrated card machine, it will print the card transaction details
– Prevent Void Mode Printing: If ticked, when a void mode transaction is finalized, it will not print out a receipt.
– Print No Change: If ticked, when a transaction is finalised and no change is required to be given to the customer, this will be printed on the receipt.
– Tender / Total / Change / Order Number Font Style: This determines the font style for the Tender, Total, Change and Order Number lines. This can be set as either: Normal, Normal Bold, Double Height, Double Height and Bold, Double Size, and Double Size and Bold.
– Item Sort: This will determine how items will be sorted on the receipt, the options available are: Order As Entered, Order By Description, or Order By Product Code.
– Group Sort: This will determine if the receipt will be ordered by groups. The options available for this are: Order By Group ID or Order By Group Description. Setting this will separate the receipt items into different groups rather than one big list of items.
– Print Group Name: If ticked, and the receipt is set to Group Sort, this will print the group name.
– Print Group Total: If ticked, and the receipt is set to Group Sort, the overall total of the group will print on the receipt.
– Print Date: If ticked, the date will print on the top of the receipt.
– Print Time: If ticked, the time will print on the top of the receipt.
– Print Order Number: If ticked, the order number will print on the receipt. This will be crucial for environments with a Collection Board.
– Print Clerk Name: If ticked, the clerk name will print on the top of the receipt.
– Print Terminal Name: If ticked, will print the terminal name on top of the receipt.
– Print Transaction Description: If ticked, this will print the transaction description on the receipt.
– Print Tax Breakdown: If ticked, at the bottom of the receipt a tax breakdown will be printed out.
– Print Item Count: If ticked, the number of items sold will print out on the receipt.
– Print Unit Prices: If ticked, the unit prices will print out on the receipt.
– Print Header Bold: If a header message has been entered and this option is ticked, the header message will print in bold.
– Header Alignment: This is the alignment of the header message. This can be set to Center, Left, or Right.
– Header Text: This is the message which will appear on the header of the receipt. You can use the text field here to enter the message you wish to have.
– Print Footer Bold: If a footer message has been entered and this option is ticked, the footer message will print in bold.
– Footer Alignment: This is the alignment of the footer message. This can be set to Center, Left, or Right.
– Footer Text: This is the message which will appear on the footer of the receipt.
– iMin Receipt Image: If you are using an iMin device with an in-built printer, this option can be used to select a graphic logo which will print on top of the receipt. Pressing the Select button will open the eZeePOS image library which will allow you to select an image.
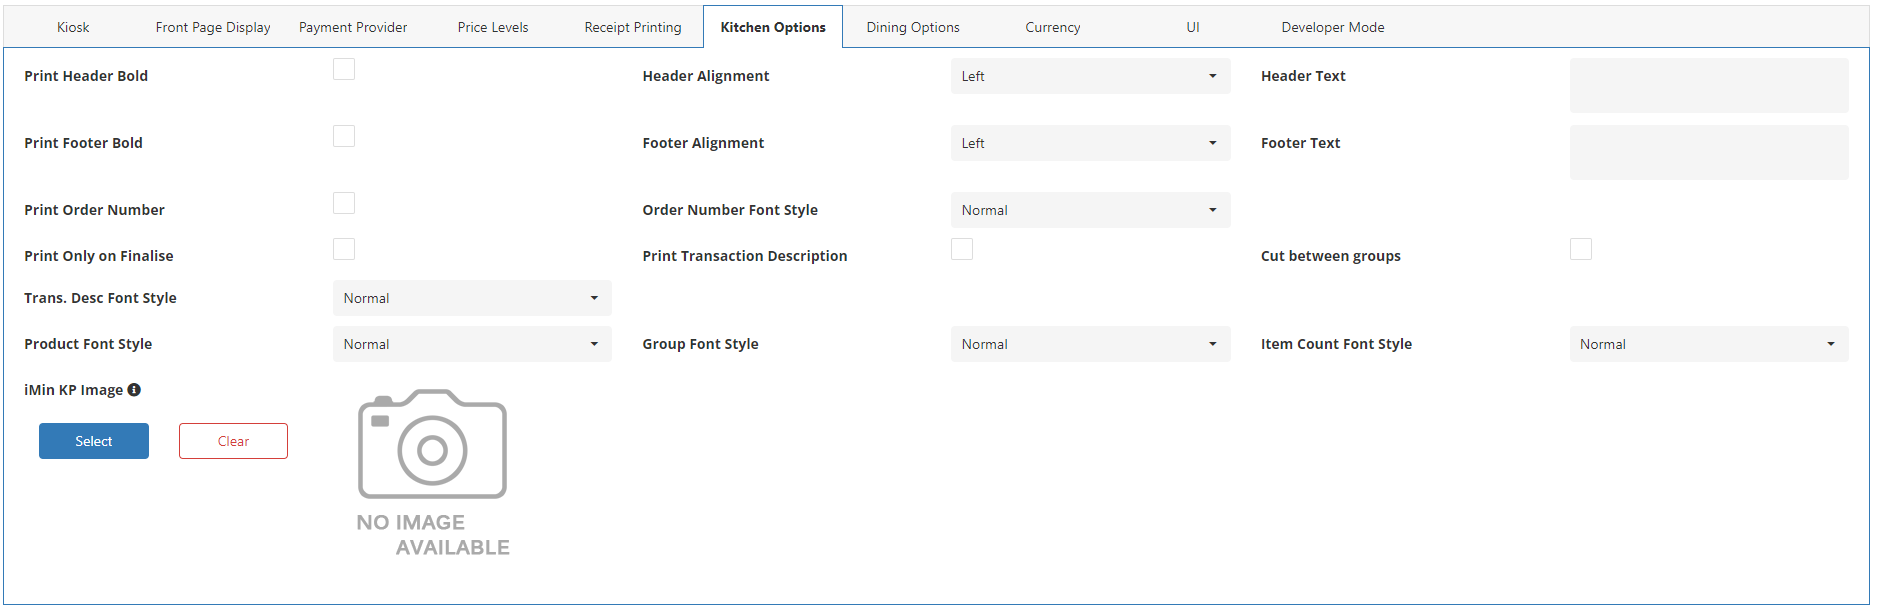
Kitchen Printing #
These settings are used to determine how the kitchen will print. Working from the top down we have the following options:
– Print Header Bold: If a header message has been entered and this option is ticked, the header message will print in bold.
– Header Alignment: This is the alignment of the header message. This can be set to Center, Left, or Right.
– Header Text: This is the message which will appear on the header of the kitchen ticket. You can use the text field here to enter the message you wish to have.
– Print Footer Bold: If a footer message has been entered and this option is ticked, the footer message will print in bold.
– Footer Alignment: This is the alignment of the footer message. This can be set to Center, Left, or Right.
– Footer Text: This is the message which will appear on the footer of the kitchen ticket.
– Print Order Number: If ticked, this will print the order number on the kitchen ticket.
– Order Number Font Style: This determines the font style for the Order Number. This can be set as either: Normal, Normal Bold, Double Height, Double Height and Bold, Double Size, and Double Size and Bold.
– Print Only on Finalise: If ticked, the kitchen tickets will only print when the transaction is finalised.
– Print Transaction Description: If ticked, the transaction description name will print on the kitchen ticket.
– Cut Between Groups: If kitchen print groups have been set and this option is ticked, as each group will be cut as separate tickets.
– Trans. Desc / Product / Group / Item Count Font Style: This determines the font style of the aforementioned lines. This can be set as either: Normal, Normal Bold, Double Height, Double Height and Bold, Double Size, and Double Size and Bold.
– iMin KP Image: If you are using an iMin device with an in-built printer, this option can be used to select a graphic logo which will print on top of the kitchen ticket. Pressing the Select button will open the eZeePOS image library which will allow you to select an image.
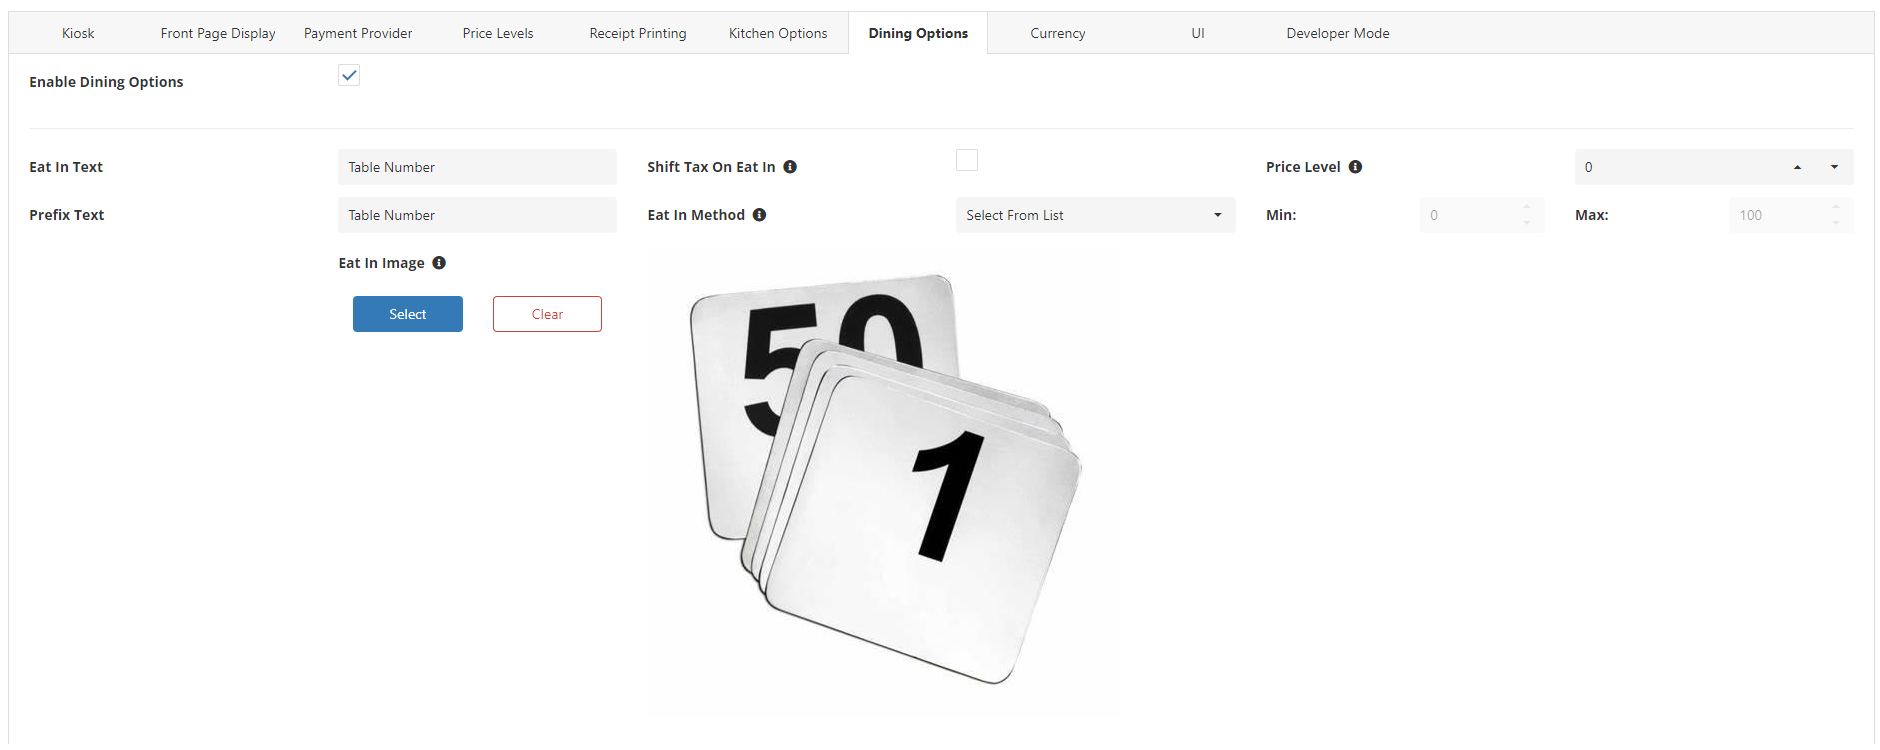
Dining Options #
Dining Options can be setup to allow the customer to select how they will be dining at business they are at. There are 3 default text values (Eat In, Take Out, and Delivery) but these can be renamed as required.
To enable this, you will first want to tick the Enable Dining Options box.

Below this you then have the 3 different Dining Option sections. We will cover one of them here but the settings are the same for the other 2.
– Eat In / Take Out / Delivery Text: These are the default values however they can be renamed as required.
– Shift Tax On Dining Option: If set, and this dining option is selected with it set, tax rates 1 – 5 will be shifted to 6 – 10. i.e. an item with a tax rate set to 2 will use tax rate 7.
– Price Level: This is used to determine what price level is used when this Dining Option is selected.
After this we then have a few extra options.
– Prefix Text: If a method is selected, this is the prefix text that will appear on the method selection screen.
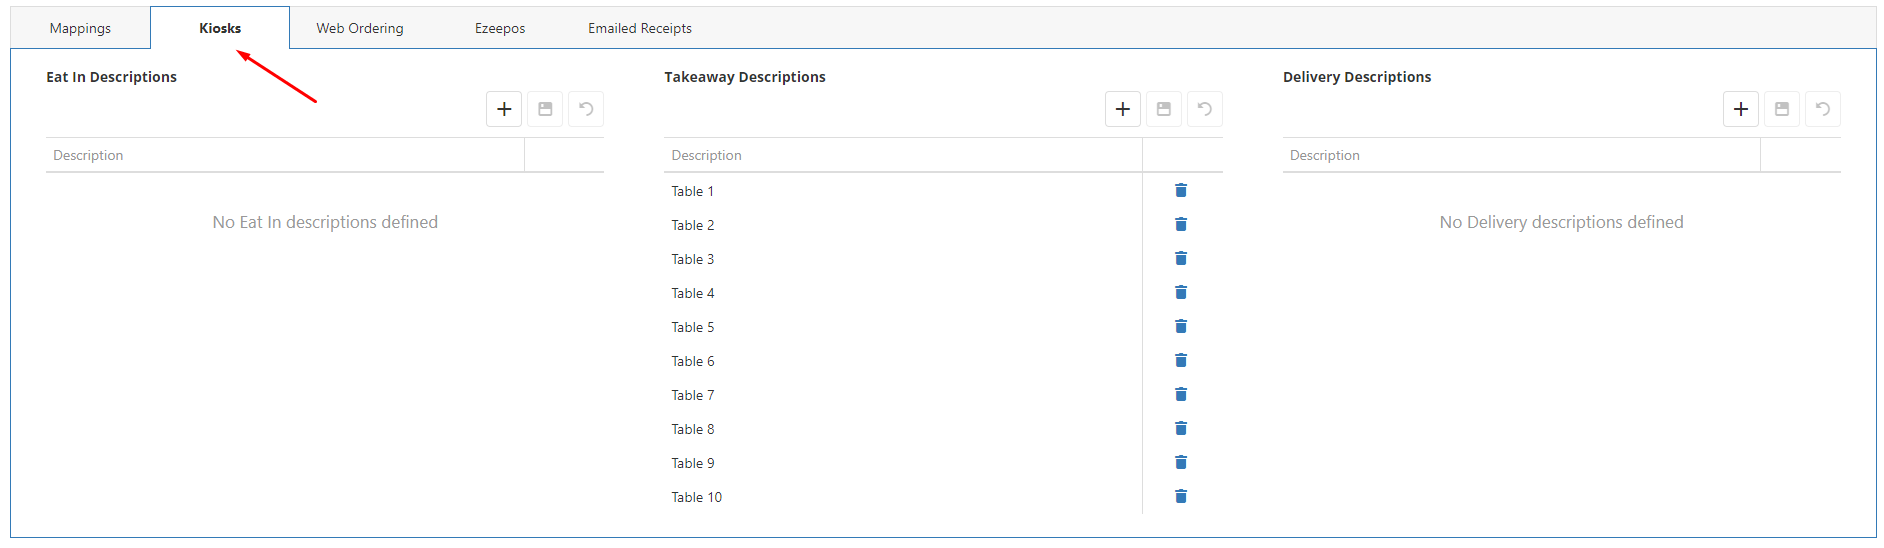
– Delivery Method: This is the method in which the customer will enter the required information about their order for this dining option. This can be set to None, Numeric Entry, or Select From List. If None is set, as soon as they press this dining option, it will take them straight to the front product page. If Numeric Entry is selected, this will prompt the user to enter a numeric value. Finally, if Select From List is selected, it will allow the user to select an entry from a predefined list of descriptors. These descriptors can be set by going to Config -> Locations -> Press Edit on your Kiosk location -> Kiosks. In this tab, you can add as many descriptions as required.
Dining Option Image: This is the image which will be displayed on the Dining Option selection page.
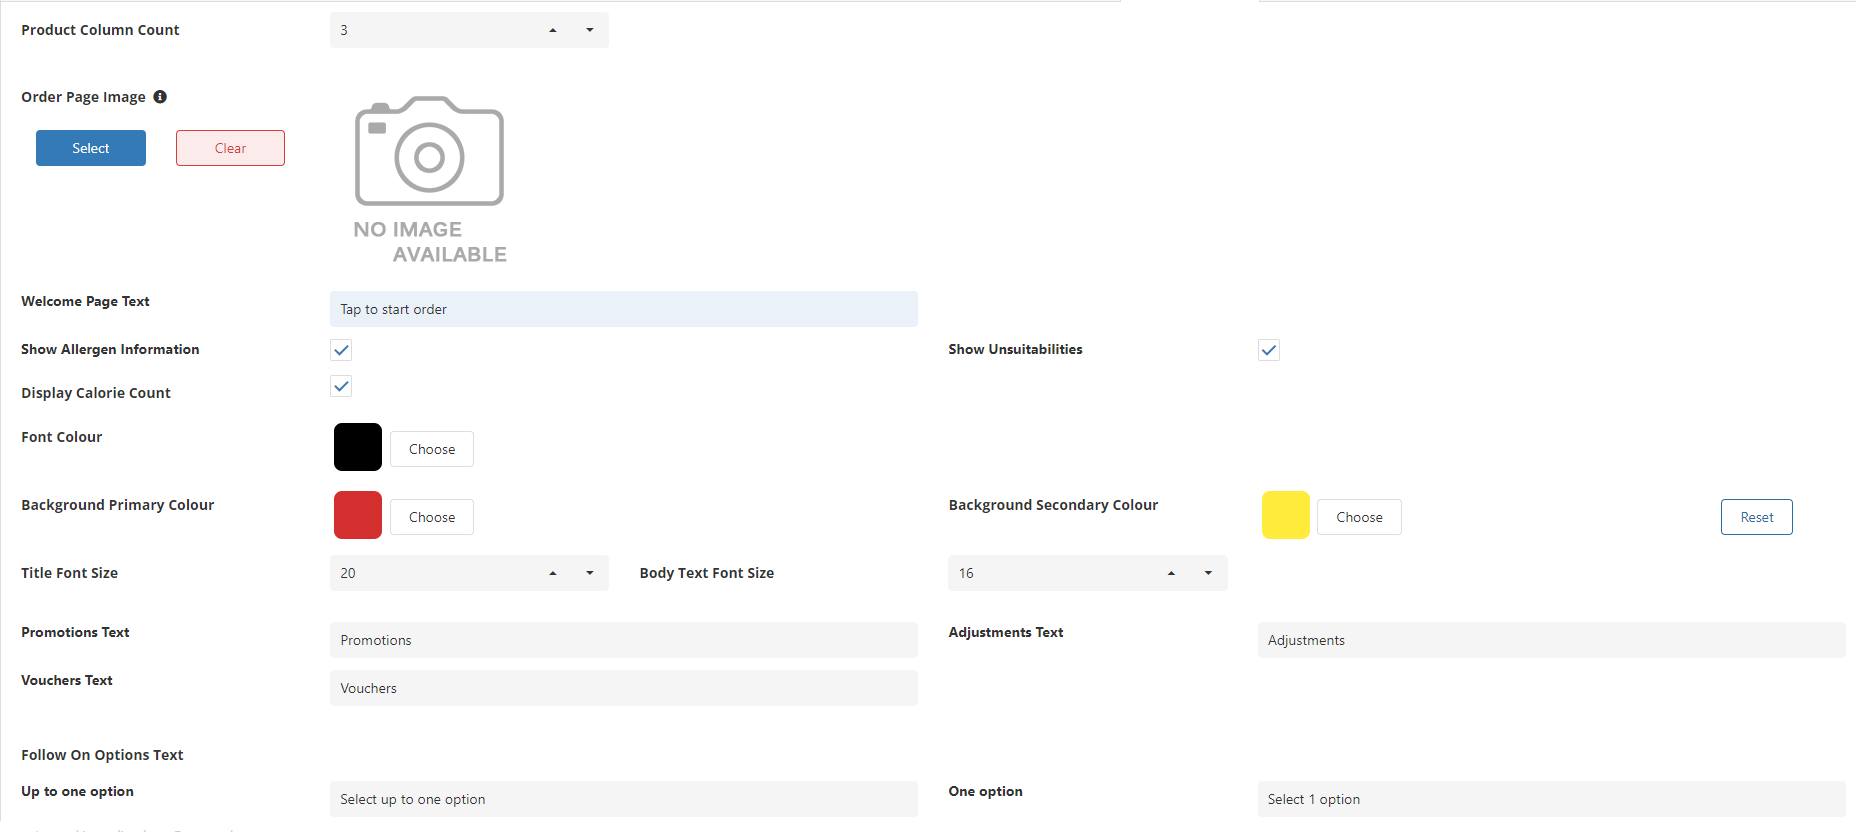
UI #
The UI tab is used to define how certain things on the Kiosk app look and come across. Below are the settings which can be set:
– Product Column Count: This is how many products / groups per column there are.
– Order Page Image: This is the image that will display at the top in the banner on the main order page where the top-level kiosk groups are.
– Welcome Page Text: This is the text that appears in the middle of the front Welcome page. This defaults to Tap to start order
– Show Allergen Information / Show Unsuitabilities: If ticked, this will show the allergen and unsuitabilities when viewing the product information.
– Display Calorie Count: If ticked, this will display the calorie values of products if they have this set.
– Font Colour: This allows you to select the font colour which will be used for the majority of text in the application.
– Background Primary and Secondary Colour: A primary and secondary colour can be selected for the background.
– Follow On Options Text: These allow you to change the wording of certain options within OrderKiosk.