Our integration to Xero is supplied as part of our eZeePos Office back office solution at no extra cost. Pay your standard Xero Accounting software charges and there is no other added costs. This guide will cover how to setup the EzeePOS Office side to get this working with Xero.
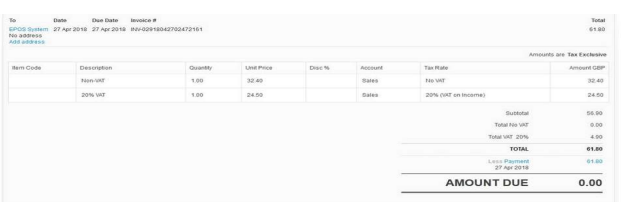
The way the system works is at the end of the day’s trading the user can log onto eZeePOS Office and export out the selectable day(s) trading. This sends the NET sales total to Xero as a single invoice broken down into Categories, the monies taken for that day are then filed as payments against that invoice. If there is an imbalance between these two totals, then the difference is posted into a holding account, but the invoice is always paid in full.
Clicking on the payment section of a particular invoice will then show all the different payment method totals that have been used to pay for the invoice.
Sample Invoice
Setup Xero
The first stage of setup is to create the Xero account to which EzeePOS Office will link.
-Go to the following address: https://www.xero.com/uk/signup
-Fill in the required details to create your account
The step after this is to create a customer. This is the entity that the invoices will be filed against.
– Select Contacts > Customers
– Press [Add Contact]
– Fill in the details and press Save
The next stage is to create a clearing account, this is the account which will hold the differences between products sold and monies taken, even if the customer always pays everything off this should still be created to cover any issues.
– Select Settings > Chart of Accounts
– Select Add Account
– Select Current Liability – Check with the accountant to see if this is correct for their business
– Enter a unique code – Again check with their accountant
– Enter the name as Clearing Account (or as required)
– Select correct tax rate
– Press Save
– Still under Settings > Chart of Accounts
– Select Add Bank Account
– Enter the correct details regarding the Bank Account used by the business
Note: for test purposes any data can be added i.e. 11-11-11 + 12345678
Setup EzeePOS Office
The first stage of EzeePOS Office is to decide which method to use to send PLUs, this can be done in one of three ways: Group Class Totals, Product Group Totals, or Product Category Totals. If PLUs in the group settings are a mixture of VAT and non-VAT totals, then you need either split them up or use the Category method again.
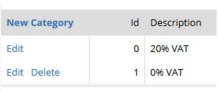
Category Method Setup – skipped for other methods
– Select Maintenance > Categories
– Select New Category
– Ensure the Category has a name
Link into Xero Setup
– Select Config > Xero
– Press Connect to Xero
– If prompted, enter your Xero username and password
– Press Allow access for 30 minutes
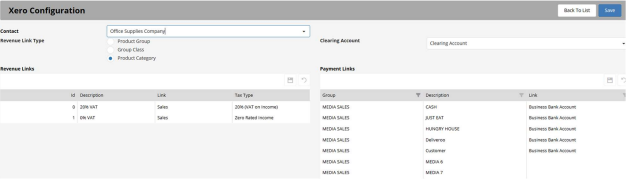
– Set Contact as the customer you created in Xero
– Set Revenue Link Type as required
Please Note: Changing the Revenue Link Type will clear all settings in the Revenue Links section
– Link each Group / Category to Sales
– Link each Group / Category to the correct Taxt Type
– Set Clearing Account as the Clearing Account created in Xero
– Under Payment Links set each Media Sales Group item used to the correct Bank Account
– Press Save
Daily Xero Upload
The user can upload data only once per day but can upload several days at once while still maintaining a one invoice per day ratio.
– Select Reports > Export to Xero
– If prompted, enter your Xero username and password
– Press Allow access for 30 mins
– A list of dates that have not been exported will appear
– Tick the date or dates that need exporting
– Press export to create the invoice within Xero