The next thing we can do with eZeePOS Office Stock is Orders, Deliveries and Purchases. When a stock order is made, we can add this into eZeePOS Office, and follow the process of ordering the products, the delivery of the products and then how many of the products were purchased.
The process of a Purchase Order is as follows:
1. The purchase order is made, and we add this into eZeePOS Office as a new Order. We select the products in the order and once the ordered items have been added, commit this. This will move the order to the delivery section. At this point, the order does not update the stock
2. The delivery arrives. We check what has been delivered, update the delivery count as needed and then commit the delivery. This will move the delivery to the purchase section. The stock will be updated here to reflect the delivered items.
3. We check the delivered items. If for example some of the items on the delivery were damaged, we update this in the purchase to reflect this and then commit. This completes the purchase order process, and we can check this in the Invoices section. The stock will also be updated to take into account the amended items.
To create an Order, you will want to navigate to Stock – Orders. This will take you to a new page. To create a new order, click the New Order button. This will open a dialog box where you will need to select which location the order is for, and who the supplier is. Once you have selected these, click Create. This will then take you to the new order screen, as shown below:
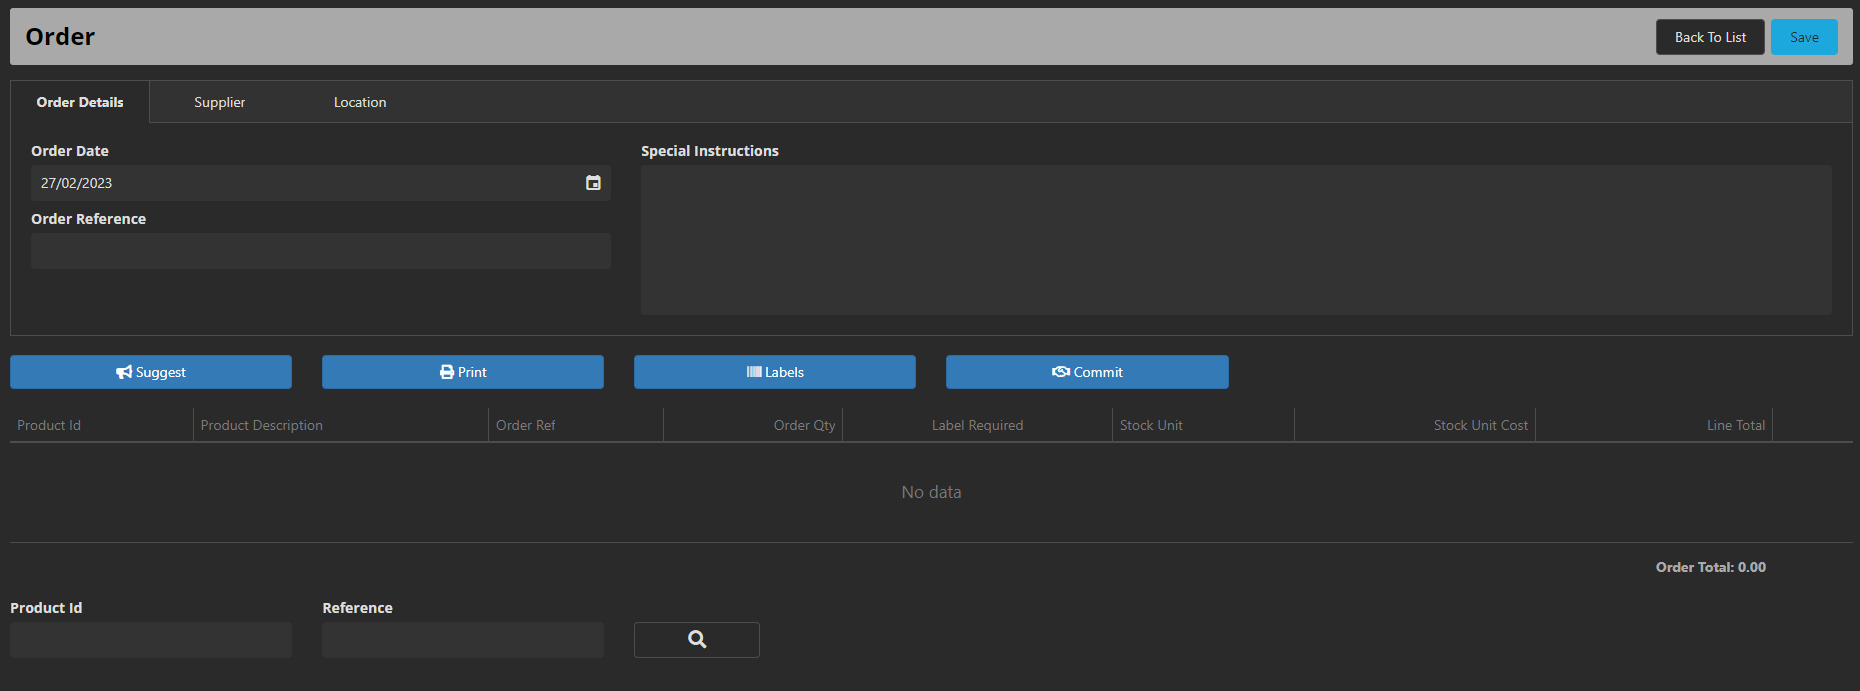
Starting from the top we have Order Details, this allows you to put in when the order was made, and what the reference is for this order. After this we have the Supplier tab. This allows for you to amend the address of the supplier if needed. This will be auto filled if you entered the Suppliers details when creating them. The final tab on the top is Location, which will hold the address of the location that has been selected for the order.
Underneath this we have the Order Date, where you can choose the date that the order was made. There is an Order Reference field as well which can be used if needed.
After this we have the four blue buttons:
Suggest: If products have had their minimum, maximum and alert levels set, eZeePOS Office can be set to suggest which products to add to an order, depending on the criteria set on the Suggest window that appears. For example, it can be set so that any products that are below the minimum stock level can be ordered up to the maximum stock level, or you can order for a set number of days.
Print: This allows for the order to be printed. The order will need to be saved before being able to print.
Labels: If a label printer is connected to the computer that is using eZeePOS Office and is setup as a Windows printer with the correct drivers, then this can be used to print labels for items in the order. In the order the product will need to have the Label Required box ticked, and when Labels is pressed, it will ask you to save. If you select Yes, this will then open another window asking which Label Format to use and Quantity To Print. Select the relevant options and then click Print.
This will open a new tab in the browser with the list of labels to print. You will just need to hit the Print icon (the location of this may change depending on the browser you are using), select the correct printer on the new window that appears and then press Print which should start printing out the labels.
Commit: Once the products have been added to the order and the order has been confirmed, you can commit this order which will save what has been entered and move this into the next section (Delivery if it is an Order, or Purchase if it is a Delivery).
Underneath this we have the product field, which shows the products that are in the order. Once products are added, it should look similar to the below screen:

Along the top we have the following fields:
– Product Id: This is the Product Identifier code of the product which is used across the whole of eZeePOS and eZeePOS Office.
– Product Description: This is the products name/ description.
– Order Ref: This is the Order Reference code for the product. This may be one that is created internally, or one given by the supplier.
– Order Qty: This is how many of the Stock Unit is being ordered.
– Label Required: If a label is required for the product, this box will need to be ticked in order to be able to print one for it.
– Stock Unit: This allows for you to choose which stock unit is being purchased, like in the above example it is Kegs. It will remove the Order Ref against the product if this is changed, so ensure to go back and edit the reference if a change is done.
– Stock Unit Cost: This is how much each stock unit costs.
– Line Total: This is the overall cost of the stock for each product. It will take the Order Qty value and multiply this by the Stock Unit Cost value.
There is also the Trash Can on the right-hand side which will remove the line should it need to be deleted.
The final section of this page is the actual search for a product. The first field is the Product Id field. If you know the ID of the product, you can enter this here and press Enter on the keyboard which will add this product to the order. Similarly, if an order has been done previously and an Order Ref was set against one of the products, you can enter this into the Reference field, and this will add the product to the order. There is also the magnifying glass which if pressed, will open a new window which allows for you to search and select a product to add to the order.
Once the Order has been committed, this will move it along to the Deliveries section, but will not update the stock.
The process for delivery and purchase works almost identically to the order section, the only things you will need to do in these sections is amend the amount depending on how many of the product were actually delivered and how many were purchased.
It is also worth noting that you do not have to follow the full Order, Delivery, Purchase process to add stock to the system. You can go straight to the Purchase section and create a new purchase in here.
Purchase Invoices
Now that we have completed our Purchase Order, we can reference them should we need to check them in the future. We can find this under Invoices. When going to the Invoices section, you will be able to see all previously completed Purchases, view them, print them and delete them if needed.