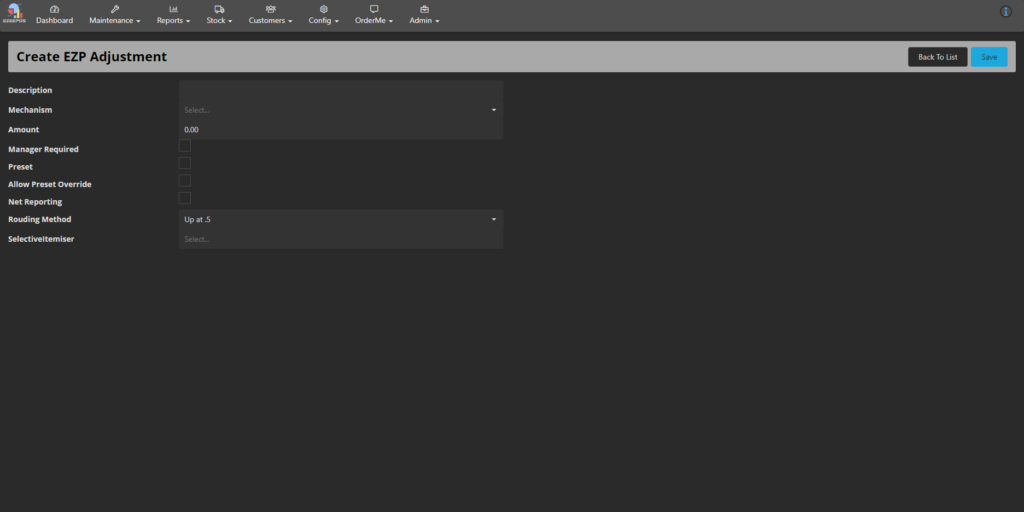
Adjustments can be used to discount or add to a sale or item. Although they will be used in the eZeePOS app, they will first need to be created on eZeePOS Office.
To get there our adjustment settings, from the eZeePOS dashboard, navigate to Maintenance -> EZP Adjustments.
You should now be on the eZeePOS Adjustments page. To create an adjustment, at the top-left of the page, press New Adjustment. This will take you the new adjustment setup page.

Below will go through each section of the adjustment setup:
Description: This is the description of the adjustment. It is important to name this appropriately as this is what will show on the transaction, receipt, and reports.
Mechanism: This is how the adjustment will work, it can be set as either: % + / -, Amount + / -, and then also as an Item discount or an overall Sale discount.
Amount: This is the amount the adjustment will either increase or decrease the sale / item by.
Manager Required: If ticked, the adjustment will only be usable by employees set as managers.
Preset: If ticked, the adjustment will always use the value set in the Amount field. If unticked, this will allow the user to enter a customer value when the adjustment is used.
Allow Preset Override: If ticked, this will allow for a custom value to be entered even if a preset amount has been set.
Net Reporting: If ticked, this will take the amount away from the product and group total.
Round Method: This is how the discount will round up the amount, the options are: Up at .5, Always Up, Always Down
Selective Itemiser: This option is used to restrict which items the adjustment applies to. For example, if you set Selective Itemiser 1 against this adjustment, any products which also have Selective Itemiser 1 set will work with this adjustment. This is useful in scenarios where you want some items to be discounted, but the others to not be affected by the adjustment.
Once you have set the adjustment as required, press Save and this will create the adjustment. You will then need to refresh your terminal data and the adjustment will appear.
